GUEST POST: Organizing Your Child’s Library

“So please, oh PLEASE, we beg, we pray, Go throw your TV set away, And in its place you can install, A lovely bookshelf on the wall.”
— Roald Dahl, Charlie and the Chocolate Factory


If your child has enough books to operate her own children’s library, is it possible that she has too much of a good thing?

First of all, is storage space or clutter the primary concern? Have you weeded the toy population yet? (In my humble opinion, books trump toys!) If so, by all means limit the number of books to fit comfortably in the child’s room. Work with your child to set aside stacks of his favorite books and those that don’t appeal to him. Don’t state that any books will be discarded at first, as this may result in a number of unlikely additions to the favorites pile. Some “special” books may include favorite bedtime stories, gifts from family members, or the first book that your child read on her own.

If your little one is too young to help with this task, spend a week or two paying close attention to his current likes and dislikes. As you know best, some items are grabbed and handled more than others!

Once the selection is complete, set aside any discarded books that once had special meaning for you and your child. If space permits, he may value having these as an adult. You may also wish to store seasonal favorites or any books that you suspect your child has discarded because they are too advanced for her present reading level. These may also be stored and introduced at an appropriate time (more on that later!).

Whether your home can hold the entire Library of Congress collection or only a single shelf’s worth of books, now is a great time to consider the role that the books in your child’s room play in her literacy development. It’s amazing how significantly home-based reading habits and choices can affect your child’s reading confidence and proficiency!

Remain in active dialogue with your child’s teacher and other caregivers about her reading habits and development at school or daycare. We teachers are always happy to support at-home learning! Whether you hear that your child could use some support to reach grade level proficiency, is right on target, or is several steps ahead of his peers, you’ll be able to reinforce and challenge his learning at home.

Maintaining book balance:

Even timid readers typically feel very proud of their reading accomplishments. Be sure to keep a few books that your child has mastered recently and allow her the opportunity to “show off” her skills by reading aloud to you or a sibling. Likewise, particularly if your child is an emerging reader, keep those alphabet and phonics-based books handy. She may benefit from looking back at these for some time.

Every child requires a bit of challenge for reading advancement. Your child’s book collection should include several books that are challenging for him to read alone, but that, with your help and practice, he will be able to master with effort. Parents can be particularly helpful during a child’s transition from picture to chapter books. It’s a good idea to have a few of these on hand and read them with your child in small doses, even if he resists reading them alone or isn’t yet able to do so.

Whether or not you have the space for serious stacks or a single shelf, remember that reducing the number of things your child owns is a great opportunity to teach lasting positive behaviors. Consider helping your child decide to donate some favorite but outgrown books to charity. Exchanging books at a used bookstore is a great way to teach the concept of “reusing” resources.

Finally, don’t forget your neighborhood library! You’ll be happy with the saved space and money. Your child will find an abundance of books free for the reading and will gain a sense of responsibility when she learns how to check out a book, enjoy it at home, and return it on time so others may enjoy it.

Back to the original question for a second, though—the teacher in me says there can never be “too many” books in a child’s life—it’s really just a matter of managing their presence appropriately.

–Erin L. Kelly, M.A., C.A.S., M.Ed.
Art Conservator / Educator / Outreach

Erin is an independent educator, art conservator, and visual artist who enjoys writing and promoting creative projects in her spare time and is happy to call Atlanta home. She enjoys teaching students of all ages and has worked in traditional classrooms, universities, museums, and remotely, as a distance learning coach. Along with visual art and art-integrated science, English, and math instruction, Erin offers curriculum design, content, and consulting services.

Holiday Gifts – Plan Ahead for a Stress-Free Season

It is officially December, which means the gift-giving season has begun. For some, holiday gifting can be stressful due to the money and time required to purchase, wrap and ship out your gifts to all of your loved ones. Don’t fret! The Well-Organized Woman is here to help you plan for a stress-free holiday season with these organizational gift-giving tips!

Timeline - Identify which gifts are ‘due’ when so you can work backward from those deadlines to build your oganized gift schedule.

  • For those gifts that need to be mailed to the recipient, allow 1 week for mailing and 2 days for wrapping. In other words, if your gifts need to arrive by the 23rd, begin wrapping them on the 14th and mail them out on the 16th.
  • For those gifts that you’ll be ordering online and sending directly to the recipient, make sure to order at least one week before you’d like them to arrive. If they are coming to you first before you mail them out, make sure to order them with ample time for them to come to you, get wrapped and then be mailed out. In fact, you may want to get started on ordering those gifts this week!
  • And finally, for those gifts you’ll be presenting in person, I’d recommend having them wrapped up two days before giving – simply for peace of mind so you aren’t rushing to complete your wrapping.

Budget- Set a budget and stick to it. You can do this one of two ways:

  • Set a mini budget for each person on your list – start with the amount you have to spend overall and then designate an amount or a percentage of that to your giftees. You’ll be surprised how creative you can get when you have parameters around how much you can spend.
  • Set an overall budget for the whole group of recipients. This can be tricky, though, as it’s easier to go over or lose track of your expenses in the moment. I recommend budgeting by person within your overall budget.
  • Allow yourself just a touch of leeway for each person. $5 of ‘invisible’ budget built in for each person can save you from going way over.
  • Don’t forget to budget in the supplies you’ll need, including wrapping paper, scotch tape, scissors, to/from labels, postage, stickers, ribbon, boxes, bubble wrap, packing tape, etc. These things can get pricey!

Shopping List – To the extent that you can, make a shopping list for the gifts you’ll be buying. Like an ambiguous budget, an ambiguous list can lead you to either buy more than you need or buy something that just isn’t right. If I’m just not sure what to get for someone, I’ll ‘window shop’ online first to get a sense of what I might want and then head to the stores to see what I can find.

Shop- Online or In-Store? Well, that’s up to you and your preferred shopping style! Over the years, shopping online has become a convenient way to take care of all of your holiday gift needs. You can avoid the crowds and often get great deals through a company’s internet store. However, a good old-fashioned shopping trip can also get you in the spirit and save on shipping costs, which can add up quickly. I like to mix it up and do a little of both. For those friends/family who I won’t be seeing before the holiday, I’ll buy their gifts online, select the store-wrapping option and send them directly to the recipient. For those I’ll be seeing face-to-face, I’ll often buy their gifts from stores – it helps to see and hold the gift while visualizing them opening it up.

Wrap – Now for the fun part! I love wrapping gifts and have such a blast picking out the papers I’ll use each year. Wrapping paper can be pricey, though, so I always go to my stash from last year to see what is left. I use that paper to wrap gifts for people who are new to my list because they haven’t seen that particular wrapping before. I love the Container Store for gift wrap, and Target also has great choices. If wrapping doesn’t come naturally for you, the Container Store offers in-store demonstrations and has great instructional tips on their website. Click here for ideas and for your nearest store!

Ship – As I mentioned above, allow at least one week for your gifts to ship based on the date you choose for their arrival. Also, buying your own packing supplies can save you a lot, as many shipping centers charge quite a bit to use their supplies on the spot. As for which shipping service to use, that is certainly up to you. Personally, I have had great luck with FedEx Ground shipping and do recommend the service.
For additional advice on gift giving for all of the people in your life – even your hairstylist and your mailman – check out The Well-Organized Woman’s TV clip from CBS Atlanta!

Best of luck in your gift-giving endeavors!
Cheers,
-TWOW

GUEST POST: How To Plan a Party — Fast!

Recently, I was faced with quite the party planning conundrum. The date of my housewarming party in Brooklyn was one week away, and my significant other had just broken his arm. I knew I was on my own, on a budget and on the way to the nut house with anxiety. How on earth was I going to pull off a dinner party for 20 people that started at 8pm when I couldn’t be home until 6:30pm the day of??? By channeling my inner Well-Organized Woman, of course! Many of you will likely find yourself in similar stressful situations during this holiday season. Fear not! Read on for how I did it and how you can, too.

The most important thing you can do is to plan ahead and make lists — for EVERY aspect of the party. This includes menus, grocery shopping trips and the order of operations in the kitchen on the day of your party. By giving this thought ahead of time, you will be able to rely on the schedules you create to get things done throughout the week, rather than trying to remember your to-do lists in your scattered and stressed out head the night before.

  • Invitations: Save trees and create an e-vite. Everyone’s doing it! We also decided we would be happy to feed our friends, but we asked them to bring their favorite drink in the invitation. If however, you’ll be taking care of food and drinks, see below for how to buy alcohol smartly!
  • Budget: Set a reasonable budget and track your expenses. Ours was $300. Try your best to stick to this plan!
  • Supplies: ask yourself how you’ll serve the food and drinks. Plastic cups, plates and silverware make clean-up a breeze. Paper napkins with a holiday theme are fun, and you can usually get a good deal during the season on them. And don’t forget cookware! Make sure you have the right pots and pans — you don’t want to be stuck without a roasting pan an hour before your guests arrive!
  • Menus: ask yourself what you’ll serve and think about the friends who are coming to your gathering as you answer this question and make your list. For my gathering, we went casual with our food choices but did split our menu into 3 tiers: welcome snacks, appetizers and dinner.
    • Chips, pretzels and pita with salsa, white bean dip, and spinach/artichoke dip, as well as cheese, sausage, olives, almonds and dried fruit made up our welcome snacks – they were on the table as our guests arrived.
    • Appetizers included caprese salad, shrimp cocktail and italian meatballs with toasted baguette – they went out after everyone had arrived.
    • Dinner was our favorite at-home meal, rotisserie chicken with seasoned rice and a unique salad that included roasted cauliflower – this went out after everyone had a cocktail or two and some snacks.
    • For dessert, a homemade apple pie. We turned this into more of a fun group activity – some of our guests helped cut up the apples with us!
  • Grocery Shopping by Days of the Week: Split your shopping and tasks up by days of the week and create a to-do list foreach day. Work backwards in order of freshness. For the ingredients that need to be at made the same day they are eaten (rotisserie chicken, shrimp cocktail, and baguettes, for example), buy those the day of your party. Ingredients such as produce, sausages, cheeses, fresh olives and sauces can be purchased the day before the party. They will keep overnight. Dry goods (rice and pasta, chips, nuts and dried fruit) and supplies (see above) should be picked up well ahead of time. You’ll feel like you have a head start on your shopping, and these things will keep with no worry to you.
  • Alcohol: Though we asked our friends to bring their favorite drinks, we did buy some alcohol — but we were smart about it. Trader Joe’s makes wonderful wines for $3-5 per bottle! You can’t beat that. Or try a store like Costco for great deals in bulk.
  • HELP: recruit a friend to help you that evening. She can pour chips in bowls and cut up ingredients while you are cooking.
  • Party Outfit: Decide what this will be and lay it out the night before, right down to the hosiery, shoes, jewelry and makeup you’ll need.
  • Day Of: To declutter your mind, make a list of every step you need to take from the moment you walk in the door to the moment you put out the food, including getting dressed for the party. Put the responsibility down on paper! Once it’s on the list, it can be out of your mind. Here’s an example of my list to get you thinking in an organized and ordered manner..
    • Pull any frozen meats out of freezer to defrost that morning (example: ground meat for meatballs).
    • When you come home, put on your party dress and touch up your makeup FIRST, otherwise, you will not have time to do it. Trust me. Since you laid it all out the night before, this should be quick and easy.
    • I knew I had two items that needed to be prepped and baked. They had the same baking time and similar temperatures, so I took care of preparing the dishes (artichoke dip and roasted cauliflower) and put them into the oven. The rice was also set to take the same amount of time to cook, so I put that to boil at the same time the dishes went into the oven. As they baked, I chopped veggies and blended my other dip in the food processor, while my friend opened our supplies and put things in bowls on the table.
    • Once our guests arrived, I put the rotisserie chickens (store bought) into the oven to warm them up while guests munched on snacks, ate appetizers and sipped cocktails.
    • Dinner was then served followed by pie baking. Don’t forget to eat!

    And finally, once the guests are gone, do a quick clean up by placing bottles and cans on the counter, dishes in the sink and trash by the door. You can do all the major cleaning the next day but you’ll be happy you pre-organized your efforts. –Elise, Social Media Director and Contributing Blogger

Organizing your Jewelry is a Cinch!

My lovely and creative client, Brawner Raymond, recently shared her brilliant idea for organizing and displaying her jewelry at home. I loved what she did so much, I wanted to show it to all of you! These pictures below show her genius use of cork boards and pins to hang her baubles. How creative! -TWOW


Claire Kurtz Organizes Her Closet: A Follow-up Post

As a follow-up to last week’s post, I’d like to share my own seasonal closet changeover experience. After all, I wouldn’t be the Well-Organized Woman if I didn’t follow my own advice! It’s really taken an unexpected turn towards arctic temps this week here in Georgia, so I knew it was time to dig in – out with the old and in with the warm and cozy, I say! And yes, ‘arctic temps’ is a slight exaggeration.

Sandals to Keep

I started the closet rotation by gathering my summer clothes and shoes and sorting into my store, donate and trash piles. Decisions for what to keep are usually pretty easy for me, so I was able to quickly gather and bag these items for storage. These silver sandals were my only question mark for the keeps.  I like them but I’ve owned them for two summers and have worn them once. I’ll give them one more summer, and if I don’t wear them again, they’re out!

I like to cycle things in and out of my wardrobe, so donate and trash piles are not too much of a struggle for me, either. However, I still like to give them a little thought. I picked out a summer dress, a black lace cami and a pair of shoes to donate. The dress is a color I like but it requires a cami under it and a shrug over it, and I’ve never felt great in it. It’s still in good condition so off to Goodwill it goes! I purchased these shoes on sale while shopping for boots. I’ve worn them once, they hurt my heels and aren’t even my style so….Goodwill for these, as well. And finally, this black lace cami is still in good condition, but I no longer like it so that was a fast drop into the donate pile.

Cami to Donate

Shoes to Donate

Dress to Donate

Yesterday I grabbed my trash items quickly. A few undergarments went right in the trash, of course, and then I said goodbye to this comfortable but shapeless sleep shirt and this well-worn work shirt.

Shirts for the Trash

I have to place an online order for basic camis and tank tops first, and then all of the old versions are into the trash, as well. (I’m very hard on my clothes!!)

Our Home Storage Unit

At home, my husband and I use this 9-cube organizer in our closet to store all sorts of clothing: in winter – sweaters and work-out clothes and in summer – shorts, work-out clothes and tanks. Clients may recognize this organizer as the one I recommend for virtually any room! From playrooms and craft rooms to closets and kitchens, it’s a great multipurpose storage item.  It is now empty and ready for our trip to storage this evening to retrieve our sweaters and winter work-out clothes.

Ready for a trip to storage!

We love living in Midtown Atlanta, but the trade-off for city living in a condo is, of course, space!  Our solution is a storage unit nearby that holds our off-season clothing, large luggage and various holiday decorations.

Every seasonal closet rotation or decorating spree requires a quick trip to the storage space where we pull out the new season’s needs and pack in last month’s goods until next year.

And with that, I’ll wish you a happy weekend!
–TWOW

Get Your Closet Organized: The Seasonal Changeover

The leaves are changing, the air is crisper and the mornings are cooler, which means it’s time to get your closet organized for the fall and winter seasons! It’s time to say goodbye to summer dresses and linen pants and hello to cashmere sweaters and wool trousers in just a few simple steps. Let’s organize your closet!

First, remove all distinctly spring/summer items from your closet and dresser.  This is the perfect opportunity to weed out the things you no longer want/wear from the things you’ll need to clean and store. Make three piles: Store, Trash, and Donate.

Store Pile: these are the clothes you will wear again next year when warm weather returns. Clean these items first. It may seem like a lot of effort, but you’ll be glad you did it when you can pull them straight from storage and into your closet!

  • Decide what vessels you’ll use for storing the clothing and designate a place for them to live. This is a good time to use those hard-to-reach shelves at home since you won’t need to access them for months.
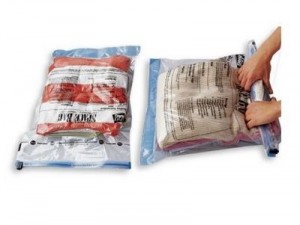
  • We recommended Spacebags for traveling, and we also recommend them for storing clothing efficiently. Rubbermaid and Sterilite tubs are also a good storage solution.
  • Consider including anti-moth/anti-insect solutions in your vessels, such as non-toxic, chemical free Moth Away or Cedar and Lavender Moth Balls.  Try to avoid storing clothing (or bedding) underneath the bed.  This is a great place to pick up unwanted pests.

Trash and Donate Piles: Separate those items you’ll donate from those items you’ll simply need to throw away. Example: white tees with stains should be trashed, whereas the trendy romper you bought for only a season can be donated to the Goodwill or Salvation Army.

  • Send your trash pile to the garbage. You can also cut up certain items to use as household and garage rags.
  • The items you’ll be donating should be cleaned as a courtesy to the charity receiving your used items.
  • Make an itemized list of the number of shirts, pants, skirts, shoes, etc. you are donating. You’ll need this for calculating tax deductions for next year and for your receipt from the donation center. Here is the Salvation Army’s great online donation valuation list to help you get organized.
  • Place the cleaned and folded items in bags and take them directly to the trunk of your car. This will ensure they’ll actually make it to the Goodwill, rather than pile up in your home. Furthermore, set a date on your calendar for drop off to ensure they’ll make it out of your trunk, as well!

Second, you’ll need to remove fall/winter items from your storage containers. Here is another great opportunity to assess what you’ll need for the season and what you’d like to get rid of from last year.

  • Repeat the Trash/Donate pile process from above with your fall/winter items from last year if you find any clothes your style has outgrown.
  • Separate those articles to hang in your closet from those to be folded in your dresser.
  • Whenever I work with a client to organize a closet, we group items together by piece and use.  For example, all suits are hung together; all dresses grouped by cocktail, work and casual styles; all dress pants, all casual pants, all denim, etc.  It may sound a little exacting to the free spirits out there but it really works to help you to see what you have and what you need.
  • In your dresser, I recommend designating a drawer for each category. For example, tees and tanks in one; socks and undergarments in another and workout gear in another.  I recently used these great Dream Drawer Organizers for a client’s t-shirt and shorts drawers and he loves them.  We were able to utilize his limited drawer space more efficiently and divide t-shirts and shorts into everyday and sports-oriented uses.
  • Once your items are hung or folded in front of you, take note of what is missing that you’ll need for the season.
  • Make a list and a plan for shopping — that’s the best part!

Enjoy!

-TWOW

Work It: How to Stay Organized at the Office

Last week we featured a Winning Workspaces article on our Facebook page that shared tips for organizing your desk and office space. We really loved what this piece had to say and felt it was only fair to follow up with our perspective on office organization, so read on for a few WOW-approved tips and tricks.


Two of the most common questions that potential and existing clients ask me are: ‘How do I organize my desk at work?’ and ‘How do I keep my desk organized?’. At the Well-Organized Woman, we believe that an organized work space encourages a productive work day, so my answer to these queries is almost always the same — take the time to establish and stick to organizational routines and layouts for yourself and your space. Spending a few extra minutes to organize your tasks and your desk before your day begins and as your day ends ensures that your time out of the office is spent on your personal life — the good stuff!


Evening Leave Work Routine: Take 5-10 minutes each night to complete an “office re-set”
-Clear desk of random paper and notes, and return items to their designated place
-Write to-do and to-call lists for the next day
-Check next day’s calendar for meetings
-Stair step work – Stack projects, folders and papers in the order you’ll need them for the following day 
- Send any emails that will generate responses/information you need to start working the next morning
The goal is to set up your workspace as a command center. When you arrive to the office the next day, you can sit right down and start the day’s tasks.

Morning Get to Work Routine: Make a game plan before you get in the game.

- FIRST, determine the top 3 must-do projects for today, everything else you complete is gravy
- THEN, answer any urgent emails. Some productivity experts suggest waiting at least an hour after waking up to check emails. You want to be awake and thoughtful when you respond to anything urgent.
- Tackle your to-do and to-call lists in chunks, attacking your hardest tasks first.
- Consider breaking your day into hour-long periods, each dedicated to a different sector of your to-do list. Often, one hour of dedicated time on a project can lead to more productive results.
- If meetings are taking up important work time, carve out an hour (or two) on your calendar where you cannot be booked. This ensures you’ll actually get to spend time on the work you need to complete.

Office and Workspace Organizing: A place for everything and everything in its place

- Office supplies – do not hoard them! Keep only what you need for day-to-day work.
- Create a desk layout according to your behaviors
-If you are right-handed, put your pencil cup on the right side, an arm’s length away.
-Push items you use regularly, but not daily, towards the back of the space
-Turn this layout into your desk template. Everything returns to its place when you are done using it or at the end of the day when completing your office re-set.
- Use vertical, hanging files for storage and loose, horizontal folders for actionable work that you can easily retrieve and stack on your desk.
- Only have the project folders you need that day out on your desk and label them with your project name.
Remember that the best laid plans do get derailed sometimes. If you feel your game plan is spinning out of control at any point in the day, STOP. Get up, and walk around the office or take a walk around the block. When you return, reorganize your space and get back to work. A mini re-set in your day can help you get your efforts back on track.Lastly, if these tips and tricks have your head spinning, start small and slow by adding one or two new behaviors every few days. You’ll be able to gauge what works best for you on your journey to productivity at work.

Good luck!
-TWOW

Recommended Books:
Organizing from the Inside Out by Julie Morgenstern
Eat That Frog by Brian Tracy

Choosing Your Personalized Stationery

Recently, I ordered two new sets of personalized stationery and an address stamp, and it struck me that I should share the process with my readers. Not only is having your own stationery a small way of showing care for yourself, but it also shows your recipients that you think they are special. After all, there is nothing more personal and thoughtful than a handwritten note.

I am crazy about stationery and always have been. In my pre-WOW years, I even collected too much of it! I had note cards of every style, shape and size. As I began my transformation to a well-organized life, I realized that I didn’t need so much of a variety, but instead wanted something a little more personal.

Claire's Personal Stationery

I’ve heard similar stories from many clients who, as they discovered the well-organized woman within, made the choice to free themselves of quantity and opt for quality.

To create a streamlined, organized and simple stationery wardrobe, you can start small with a set of correspondence cards, fold-over notes (informals) and envelopes.

  • Personal Set: Allow yourself one set that is just for you for personal notes, thank you notes, notes of sympathy, etc. I’ve included pictures of my choice for my own personal set.
  • Family Set: A set for you and your partner or family is optional but often appropriate. It can be perfect for thank-you notes and attaching to gifts from the family or the two of you. If your spouse does not want his own stationery, a family set with just your last name initial is easy for him to use, as well. I’ve also included a photo of my family set choice.
  • Gift Enclosures: I ordered gift enclosures with my new set of stationery. They are usually the size of a business card, come with a corresponding envelope and are perfect for tucking into a gift.
  • Materials: For fine stationery, choose cotton paper. For informal stationery, any material is appropriate.
  • Color: The most common paper colors are white and cream, but choosing an unexpected text color, border or embellishment to express yourself is one of the pleasures of selecting your personal stationery.
  • Layout: Your name and/or monogrammed initials can be the central image of your stationery, while your address should be printed on the back of the envelope. You can also opt for an address stamp or personalized embosser, instead. I chose to print our address for my family stationery and to use a fun address stamp for my personal set.

Kurtz family stationery

After choosing your signature stationery, make sure to designate its place in your home office or bedroom. Keep pens, stamps, tape, embosser, and address stamp in the same place, as well, so that dashing off a quick thank-you card or writing a note of sympathy is not a time-consuming process. Remember, the point of being well-organized is to move through your life smoothly and easily. You want to be prepared but not over-stocked.

Where to Order Stationery

I have been taking advantage of Groupons offered by Paper Affair to order my new sets, but there are myriad places to order stationery to fit every budget.  Atlanta favorites include Paces Papers and Bumblebee Press.  Two online companies with beautiful options are Delphine Press and Dauphine Press.

Resources on Amazon

All of these books have crept into my collection over the years. They are great resources to explore the traditional rules regarding building and using a stationery wardrobe. Each book gives a nice bit of guidance on crafting appropriate written correspondence. As we become an increasingly informal society, it is a pleasure to engage in the social arts that fall by the wayside!

Happy Writing!
–TWOW

Power to the Purse: How to Keep Your Handbag Organized

As a follow-up to our last post, Pack it Up, Pack it In, it seems only fair to address a piece of luggage that is near and dear to every woman, every day — her handbag! A woman’s purse can be a form of self-expression and creativity, yet it can also be one of the most disorganized areas in her life. Personally, a messy bag makes me feel, well, messy! Stress and discombobulation creep into my day when I cannot find what I need, when I need it, in my purse. And what woman has time for that??

Below are our tips for keeping your handbag beautiful, organized and efficient. When your purse works perfectly for you and your lifestyle, your image gets just the boost it needs to get you through your busy day with confidence…read on!

*The key is to “re-set” your Wicker bag round each night so that you can pick up and go every morning. You can make this a nightly ritual, so that it feels like a special activity that is just for you.

  • Remove receipts and used napkins, corral loose change, replenish business cards, medicines and tissues.
  • Make sure your lipgloss, wallet, keys and mints are in the bag, as well — you don’t want to be caught without these important items.
  • Remove your or your kids’ half-eaten snacks and re-stock those items if needed for the next day.
  • Wipe down your bag with a soft cloth – it was an investment, so treat it with care.

*I often find it helpful to change bags every few days. Try it. You’ll feel like you’re making more of an effort with your wardrobe choices and you’ll be forced to constantly reevaluate what goes into the bag, what goes into the trash and what goes back on the shelf.

*Use a bag organizer like the Purse Perfector – it has many pockets for everything you need to carry, and you can easily remove it and place it directly into another bag or tote.

*Create a list of the items that are allowed in your bag, and stick to the rules.

*Assign designated areas that are easy to reach for each of your most important items.

  • Cell phone in phone pouch (most bags have them now).
  • Lipgloss, keys, pen and business -card holder in interior pocket.
  • Wallet in large bucket of purse, makeup bag, notebooks, flat shoes, etc. in the main pouch of the bag.
  • Receipts should have a designated area, as well, but make sure to clean that out every 2-3 days. Paper and wrappers are one of the biggest sources of handbag clutter for me!

*To cut down on the number of items in your bag:

  • Go paperless! Use a calendar app for your phone instead of carrying a paper planner or use a notes app instead of carrying an extra notepad.
  • If you commute on public transportation, decide whether this is a music day or an e-reader day and choose which item you’ll take in your bag. Don’t weigh yourself down with both.

And lastly, here’s a list of recommended items to fill your bag.

Lightweight Lugger:

  • Lipgloss
  • Gum
  • ID, wallet, money, credit cards
  • Phone
  • Pen
  • Keys

Heavyweight Handler (add these):

  • Notepad
  • Planner
  • iPod/iPad/Kindle
  • Flats
  • Business-card holder with cards
  • Makeup bag

Enjoy the power of the purse!
– TWOW

Pack It Up, Pack It In

The summer has come to an end, and the new school year has begun for many families. You may be thinking, Well-Organized Woman, I just returned from my family summer vacation, why should I be thinking about packing now? Well, it is never too early to assess the needs you’ll have throughout the remainder of the fall and winter seasons, and that includes preparing for holiday travel to the Private Pool Villas at Trisara.com. Putting the extra thought into your packing efforts ahead of time will certainly save you much stress and hassle when the moment arrives to head out for the holidays. With gifts, entertaining and decorations on your mind, let’s go ahead and get your packing down pat so you can spend your precious moments on the good stuff.

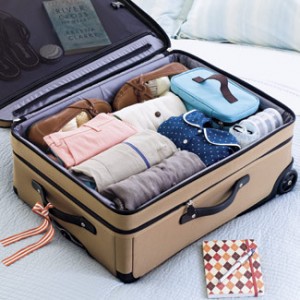
The simplest way to pack your family is to think about each day you’ll be away with the ‘head, shoulders, knees, and toes’ method. Ask yourself, What do I need for my:

· Head? (hats, scarves, sunglasses, hair bands, combs, brushes, styling tools, etc.)
· Shoulders? (shirts, dresses, swimsuits, bras, tanks, sleep shirts, sweaters, coats, etc.)
· Knees? (pants, swim trunks, skirts, underwear, sleep pants, tights, leggings, etc.)
· Toes? (socks, active shoes, flip flops, dress shoes, skis, boots, etc. Check out ShoeAdviser for great deals on these.)

Jot it down on a list for each person traveling with you, and pack accordingly!


Another factor to keep in mind while packing is the growing expense of airline baggage fees. One way to limit the amount of luggage you take is to use compression bags. These bags compress your clothing and create more space in your luggage, allowing you to use one bag for two family members. You can purchase them at local stores, such as The Container Store, or online. We like the Spacebag brand, but there are many great varieties out there!

Safe travels and Happy Fall!
–TWOW

Another Pretty Cool Site by:


Copyright 2011-2017 - The Well Organized Woman